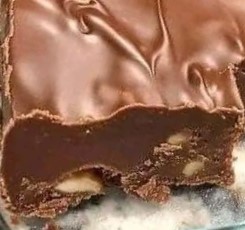
If you’re craving a sweet treat but don’t have hours to spend in the kitchen, this 5-minute fudge recipe is your perfect solution. This quick and easy homemade fudge is not only incredibly delicious but also requires just a handful of simple ingredients you probably already have in your pantry. Whether you’re preparing for the holidays, a family gathering, or simply indulging yourself, this best fudge recipe is sure to satisfy your sweet tooth.
Why This 5-Minute Fudge Is a Must-Try
- Time-Saving: Ready in just five minutes of prep time.
- Easy to Make: Simple steps suitable for beginners and even kids.
- Versatile: Easily customizable with your favorite nuts, extracts, or toppings.
- Delicious: Rich, creamy, and melts in your mouth.
Ingredients You’ll Need
- 1 and 2/3 cups of Granulated White Sugar: The foundation of any good fudge, providing sweetness and structure.
- 2/3 cup of Evaporated Milk: Adds creaminess and a smooth texture.
- 1 Tablespoon of Unsalted Butter: Enhances flavor and richness.
- 1/2 Teaspoon of Salt: Balances the sweetness.
- 6 Ounces of Milk Chocolate Chips: The key to that irresistible chocolate flavor.
- 16 Large Marshmallows: Helps achieve the perfect fudge consistency.
- 1 Teaspoon of Pure Vanilla Extract: Adds depth and aroma.
- 1 Cup of Chopped Nuts: Walnuts or pecans work great, but feel free to choose your favorite.
Instructions
Step 1: Prepare Your Equipment
Before you begin, line an 8-inch square baking pan with parchment paper or aluminum foil, allowing some overhang on the sides for easy removal later. Lightly grease the lining with a bit of butter to prevent sticking.
Step 2: Combine the Base Ingredients
In a medium-sized, heavy-bottomed saucepan, combine the granulated sugar, evaporated milk, unsalted butter, and salt. Stir the mixture over medium heat until the sugar has dissolved completely.
Tip: Use a wooden spoon or a heat-resistant silicone spatula for stirring to prevent scratching your saucepan.
Step 3: Bring to a Boil
Increase the heat slightly to bring the mixture to a gentle boil. Once boiling, continue to cook for exactly 5 minutes, stirring constantly to prevent scorching. This step is crucial for achieving the right fudge consistency.
Safety Note: Be cautious as the mixture will be extremely hot. Keep stirring to avoid any splatters.
Step 4: Add the Chocolate Chips
After the 5-minute boil, remove the saucepan from the heat. Immediately stir in the milk chocolate chips until they are fully melted and the mixture is smooth.
Alternative: For a darker, more intense chocolate flavor, you can substitute semi-sweet or dark chocolate chips.
Step 5: Incorporate Marshmallows and Vanilla
Add the marshmallows and pure vanilla extract to the mixture. Stir vigorously until the marshmallows are completely melted and the fudge is smooth.
Note: The marshmallows not only sweeten the fudge but also help in setting it properly.
Step 6: Fold in the Nuts
Gently fold in the chopped nuts until they are evenly distributed throughout the fudge mixture.
Customization: If you’re allergic to nuts or prefer a different flavor, you can omit them or replace them with dried fruits like cranberries or raisins.
Step 7: Transfer to the Baking Pan
Pour the fudge mixture into your prepared 8-inch square baking pan. Use a spatula to spread it evenly and smooth out the top.
Optional Garnish: For an extra touch, sprinkle additional chopped nuts or a pinch of sea salt on top.
Step 8: Let It Set
Allow the fudge to cool at room temperature until it is firm enough to cut. This may take about 2 hours. For quicker setting, you can place the pan in the refrigerator for about an hour.
Tip: Avoid covering the fudge while it’s cooling to prevent condensation from forming.
Step 9: Cut and Serve
Once set, use the overhanging parchment paper or foil to lift the fudge out of the pan. Place it on a cutting board and use a sharp knife to cut it into small squares.
Serving Suggestion:
Arrange the fudge pieces on a decorative platter or package them in gift boxes for friends and family.
Storage Instructions
- Room Temperature: Store the fudge in an airtight container at room temperature for up to one week.
- Refrigeration: For a firmer texture, keep it refrigerated; it will last for about two weeks.
- Freezing: You can freeze the fudge for up to three months. Wrap it tightly in plastic wrap and place it in a freezer-safe container.
Defrosting Tip: To enjoy frozen fudge, let it thaw in the refrigerator overnight or at room temperature for a few hours.
Customization Ideas
- Flavor Variations: Add a teaspoon of peppermint extract for a festive twist or a dash of espresso powder for a mocha flavor.
- Toppings: Drizzle melted white chocolate over the top or sprinkle with shredded coconut.
- Mix-Ins: Stir in mini marshmallows, crushed cookies, or toffee bits for added texture and flavor.
Why This Recipe Works
This recipe combines the traditional method of fudge-making with shortcuts that save time without compromising on taste. The use of marshmallows helps in achieving that classic fudge texture quickly, while the evaporated milk and butter add richness and creaminess. The balance of sweet and salty, along with the crunch from the nuts, makes this fudge irresistible.
This quick and easy 5-minute fudge recipe is a game-changer for anyone who loves homemade sweets but is short on time. With its rich chocolate flavor, creamy texture, and endless customization options, it’s sure to become a favorite in your household. Plus, it’s an excellent option for gifting during the holidays or special occasions.
